Looking Back At Your Preliminary Task, What Do You Feel You Have Learnt In The Progression From It To The Full Product?
When creating my continuity task I learnt many things and tips that I used in my final film. When I created my continuity task it was the first time I had ever filmed anything. The process before filming it included getting actors, writing the script, making a shot plan and making a storyboard. I also used this process when constructing the final film.
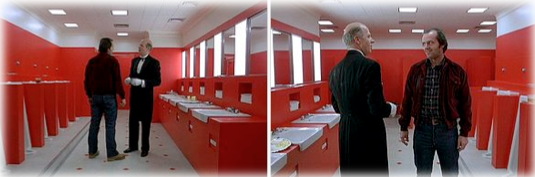
When I filmed the continuity task one of the main things to remember was the 180 degree rule. This is the spatial relationship between two actors and the camera on film. There is an imaginary line that goes down the middle of the actors, the camera can only stay one side of the line or the 180 degree rule will be broken. The 180 degree rule can be broken but it is best if you keep to it as it helps the continuity of the action. Below is an example of this. In the film ‘The Shining’ made in 1980 there is a bathroom scene where the 180 degree rule is broken.
When I filmed the continuity task one of the main things to remember was the 180 degree rule. This is the spatial relationship between two actors and the camera on film. There is an imaginary line that goes down the middle of the actors, the camera can only stay one side of the line or the 180 degree rule will be broken. The 180 degree rule can be broken but it is best if you keep to it as it helps the continuity of the action. Below is an example of this. In the film ‘The Shining’ made in 1980 there is a bathroom scene where the 180 degree rule is broken.
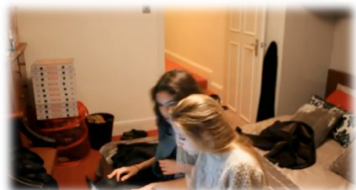
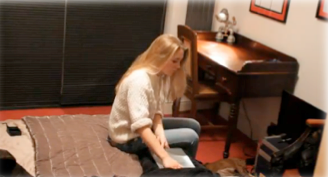
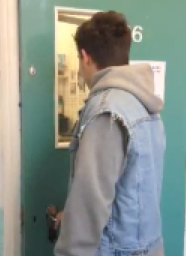
This creates disorientation for the audience. Although I understand the 180 degree rule, when creating my final film I broke it. I broke it after Leila leaves Olivia in the bedroom. The camera starts on the left hand side of Olivia and then when Leila leaves the camera crosses the imaginary line. If I was to film it again I would be sure not to break it. I would move the camera further to the right so the rule is not broken. Below are some images that show this, they were taken from my film.
|
|
In my continuity task there was no sound only the actors voices, however in my final film many sound effects and music were used. Such as the Facebook bleep and the music that occurs at the beginning with the montage. In my opinion sound creates the atmosphere and can make the action so much more powerful and tension building. Especially in a horror movie. For example in ‘The Ring’ opening when the TV makes a noise it shocks the audience and keeps them on their toes. Below is an image of what the TV looked like, taken from 'The Ring'.

If the TV didn’t make a noise and it was just the image of it, the audience wouldn’t gain the same reaction. They would be less scared. Another sound in ‘The Ring’ opening is the growl. This sound effect scares the audience a lot as they do not even see where the noise is coming from. Looking back on my continuity task I have learnt that sound plays a big part in films and without it the audience’s reaction is not the same.
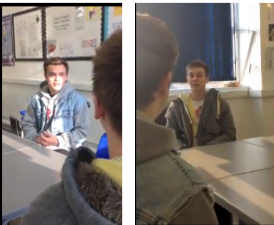
Before making both my continuity and final film I was inexperienced at shooting different shots like long shot and close up. When I shot the continuity task I practised with long shot and mid shot as well as shot reverse shot. When shooting the shot reverse shot I obeyed by the 180 degree rule by staying on one side of the actors. If I was to break the rule I would have filmed over the same shoulders of both actors.
Below are some examples of different shots from my continuity task.
|
|
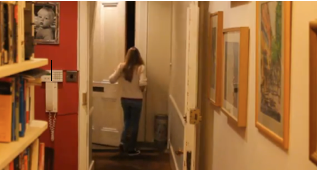
When shooting the shot reverse shot there was continuity. In the final film another place where there was continuity is when Olivia opens the front door and looks out. Below are some stills that show the continuity from my film.
|
|
I have learnt that making sure my film has continuity is very important because without it your film would not make sense and would confuse the audience. They may even loose interest. For example if you see a man close a door from the inside of the house and then from the outside the door shutting later. This is a lack of continuity.
Below is a short video showing basic shot types.
Below is a short video showing basic shot types.
Both the final film and the continuity task had scripts. The continuity task script was much simpler because it was shorter than the final film. I learnt that when making a script you must have on the right hand side ‘cut to…’ after each shot and then the actors name in the middle of the page. The first time the character is introduced into the film their character name must be in capitals so it is easy for the actor to find when they come in. Below is an example of this from my script.

Another thing I have learnt when making a script is when the shot is inside it must say ‘INT’ and when the shot is outside it must say ‘EXT’. This is so the cinematographer knows if the shot is inside or outside.
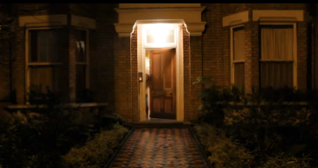
In the continuity task I only used natural lighting from the window. I learnt that if using natural lighting it must be controlled whether this be with a curtain or shooting with my back to the light. Shooting with too much light can cause an unclear image. In my final film I used natural lighting however the sun was not shining through the window it was on the other side of the house. Other sources of light that I used when filming were ceiling spotlights that were provided at the location. There were three lines of them in the kitchen. When filming in the kitchen I used two lines of the spotlights, as three of them would have been too bright. When the action moved outside I used the light above the front door as shown in the image below. This enabled the audience to see Olivia standing there. When using natural lighting it gives the action a realistic feeling.
In the continuity task I only used natural lighting from the window. I learnt that if using natural lighting it must be controlled whether this be with a curtain or shooting with my back to the light. Shooting with too much light can cause an unclear image. In my final film I used natural lighting however the sun was not shining through the window it was on the other side of the house. Other sources of light that I used when filming were ceiling spotlights that were provided at the location. There were three lines of them in the kitchen. When filming in the kitchen I used two lines of the spotlights, as three of them would have been too bright. When the action moved outside I used the light above the front door as shown in the image below. This enabled the audience to see Olivia standing there. When using natural lighting it gives the action a realistic feeling.

When both the continuity task and final film were shot the last process was editing the footage together. The director and myself (the cinematographer) assisted the editor when he edited the footage. The process when editing the continuity task was fairly easy as it was only a few shots to put together. However when it came to editing the final film it was challenging, as there were many shots to put together and we had to ensure we kept the continuity. We started editing on ‘Final Cut Pro’ however we had difficulties in entering text over the film, so we changed to a program called ‘Vegas’. We found this program much simpler and easy to use. We were able to insert text over the film easily.
Overall I have learnt a lot from filming the continuity task and the final film. I feel much more confident and knowledgeable about planning and shooting films. When I next shoot a film I will take on board what I have learnt and not make the same mistakes. For example breaking the 180 degree which was done in the final film.
Below is a voicethread I have created visualising the points I have made above.
